Chris Mac Pick
I add (Chris Mac Pick) after any gear that is currently my favorite. Click here to see what is currently on my El Capitan rack.
CLEAN AID PROTECTION
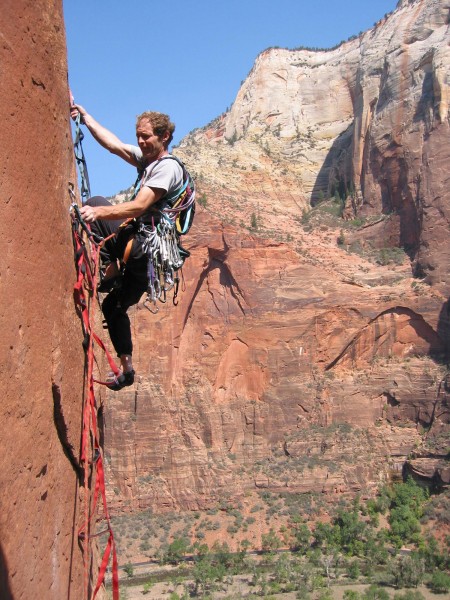 Mark Melvin using the Metolius 5 Step Aider down low on Moonlight Buttress, Zion. Credit: Chris McNamara |
||
GEAR SLINGS
I use three different gear slings in three different wall situations:
For a mostly free route like The Nose or Half Dome, I use a regular single-padded gear sling like the Metolius Adjustable Gear Sling. When you free climb a chimney or corner, you want to be able to easily throw the rack to one side of your body or the other and a single gear sling gives you this flexibility. It is also convenient to pass the gear sling to your partner at changeovers.
For a C2 or harder climb, I carry a lightweight double gear sling with one or two gear loops on each side.
For a A3 or harder wall, where I have pitons, copperheads, etc, I take a heavy duty gear sling that has two to three loops on each side like the Yates Big Wall Rack (Chris Mac Pick).
I never use a multi-loop sling like the Metolius Multi Loop Gear Sling for either the single or double gear sling. In theory, a multi-loop design gives you more options for organizing gear. but I find they make organization take longer and you can't slide all the pieces behind you if free climbing.
STOPPERS/NUTS
Some general thoughts on stopper and nuts
I always try to place a cam first. If that doesnt work, I place a stopper. Aid climbing is all about efficiency and cams are usually faster to place. Stoppers can take a long time to clean, especially if you bounce test them hard. When I climb The Nose, I usually place fewer than five stoppers and have climbed the route placing just one.
In rare cases, stoppers are handy for a placement you can't reach with a cam.
A stopper makes as much surface contact with the rock as possible. If barely touching, it is more likely to get fixed after you bounce test it. For example, on The Great Roof on The Nose, stoppers get stuck all the time because people dont use the optimal size.
Stoppers are less expensive than cams and dont wear out as fast. If you are on a budget, you may want to use more stoppers. My first time up Lurking Fear I didnt have a lot of cams so I leap-frogged cams up the long 0.5-1 cracks and every 10 to 15 feet left a stopper for pro.
Make sure you have at least some stoppers where the part that contacts the rock can slide down the cable. Useful as an improvised rivet hanger or if you find a bolt with no hanger.
TIP: Intertwine stoppers. Sometimes a rivet or stopper placement is just out of reach. Intertwine two stoppers and extend your reach by a foot or two.
OFFSET STOPPERS AND BRASS NUTS
A "must have" on any C2 or harder route. They are almost always better than regular stoppers in Yosemite and Zion where there is often a minor or major pin scar. The best small offset nuts are the DMM Peenut (Chris mac Pick) and for the bigger sizes the DMM Offset Nut (Chris mac Pick).
Offset brass nuts are especially crucial because they are often the only clean placement that works in a thin pin scar. On a route like Desert Shield in Zion, where you cant use cam hooks, I bring three to four sets of offset brass nuts for the crux pitches. My favorite is the DMM Brass Offsets (Chris Mac Pick) NOTE: Be especially careful when cleaning offset brass nuts. If you yank up, you bend the cable. This weakens them and makes them harder to place the next time. Use a nut tool and, if there are a lot of nut placements, bring a small (less than 1l-pound) hammer to gently tap the nut tool upwards (the nut tool contacts the nut, never the rock!).
NUT TOOLS
A nut tool is especially important on a big wall because when you stand or bounce test a stopper, it generally gets wedged in tight. Often to clean a stopper you need to give the nut tool a little bump either with your palm or a hammer. So make sure your nut tool lets you comfortably hit it with your palm. Also, cams sometimes get stuck when you weight them and bounce test them. So having a nut tool that lets you pull the trigger on a cam is essential.
CLIMBING CAMS
I like cams with a big range because you are more likely to get a piece that works on your first try.
I especially like to carry lots of small cams because I dont use stoppers that often. Because small cams are so light, I usually take two to three sets on most climbs and four sets on a harder aid route that has long pitches.
I only wall climb with small cams that have a flexible single stem. This allows them to fit in the widest range of pin scars and shallow placements.
SMALL CLIMBING CAMS
Aliens are the best for pin scars because of their narrow head profile and soft aluminum cams. The downside of the soft metal is that they wear out fast. So if you are like me, you often end up with a lot of Aliens that have "mushy cams" that need two hands or even teeth to retract. Another downside to Aliens is that they have had reliability problems and are hard if not impossible to find.
The Black Diamond Camalot X4 (Chris Mac Pick) has a similar design to Aliens but the harder metal they use for the cams means they don't hold as wall in flared pin scars. The upside is that they don't wear out as fast.
Overall, my recommendation is that if you are doing just a couple walls like The Nose or Half Dome, go with Black Diamond because those are cams you will want to have on your regular trad climbing rack. If you are doing a bunch of Yosemite walls, buy a couple sets of Aliens to augment what you currently have.
Check out our Climbing Cam Review to see how top small cams compare.
BIG CAMS
For bigger cams, I like the Black Diamond Camalot C4 the best because of their wide range and quality. In general, single stem cams are the best for aid climbing because they hold better in contorted placements. That said, just about any larger cam will work. So this is a place where if you are looking to save money, just use whatever cams you currently have.
OFFSET CAMS
The Black Diamond Camalot X4 Offset (Chris Mac Pick) holds better in pin scars than any other cam I have used (except maybe hybrid Aliens, which are hard to find). I consider two sets a "must have" on aid-intensive routes like Zodiac or Shield. On a route like The Nose, it is still nice to have a set, especially in the smaller sizes (up to 1).
CAM HOOKS
Once you get over the initial terror of cam hooks, they are your best friend. They help you move quickly and are sometimes the only hammerless placement for a pin scar. There are four sizes of cam hooks. I carry the narrow and wide. However, 90 percent of the time I use the narrow. The key with cam hooking is to practice a lot on the ground. It takes 50 to 100 practice cam hook placements to distinguish the bomber from the time bombs. My favorite cam hook is the Moses Cam Hook (Chris Mac Pick).
NOTE: Cam hooks are not appropriate for sandstone as the camming action blows out the edges of the crack. Instead, on sandstone load up on offset nuts, offset brass nuts, and slider nuts.
A note on hammering cam hooks: A gentle tap with a hammer can make a sketchy cam hook placement more bomber. I could recommend this practice if done rarely and gently because it might avoid nailing a piton but I am not going to. Too many people, including myself, hit the cam hook too hard with the hammer and it then becomes harder to clean than a piton. It's too embarrassing to leave a fixed cam hook, so you spend many minutes cursing, hitting the cam hook back and forth and creating damage to the rock, webbing, and cam hook.
HOOKS
Most C2 and easier walls don't require any hooking. However, it is a good idea to have a little familiarity. There are many types of hooks. In general, you only need three types: bat hook like on the Black Diamond Talon (Chris Mac Pick), standard hook Black Diamond Cliffhanger (Chris Mac Pick), and big hook like the Black Diamond Grappling Hook (Chris Mac Pick). One of each gets you by.
On harder routes, you might need a giant hook like the Fish hook. Also, sometimes on harder routes there are drilled hooks where you will need a pointed cliffhanger.
Hooking is the spiciest part of aid climbing. Small hook moves are scary. Bomber hook placements are still scary because after you move off if you dont have it as protection. Like cam hooking, the key with hooking is to make 50 to 100 practice placements a few feet off the ground. Dont hook on established boulder problems because you can break off holds.
TIP: SLIDE A HOOK UP THE WALL WITH A HAMMER OR NUT TOOL.
I have probably only done this move five times in my life, but it is my favorite aid move so I have to share: When a hooking edge is just out of reach
See what is currently on Chris McNamara's El Capitan rack.
Next Chapter: Leading 3: Placing Gear